
Step 1: Preheat the Oven
Start by preheating your oven to 350°F. Preheating is crucial because it ensures even baking. If you skip this step, your crust might not set properly, leading to a soggy bottom. Nobody wants that!
Step 2: Prepare the Crust
In a medium bowl, combine your crushed vanilla wafer cookies with melted butter. Mix until everything is well combined. The key here is to press the mixture firmly into the bottom of your 9-inch springform pan. This creates a solid base for your cheesecake, so don’t rush this step!
Step 3: Bake the Crust
Pop the crust into the preheated oven and bake for about 10 minutes. You’ll know it’s ready when it’s lightly golden and fragrant. Let it cool completely before adding the cheesecake layers. This cooling time is essential for a perfect texture.
Step 4: Make the Cream Cheese Mixture
In a large mixing bowl, beat the softened cream cheese, powdered sugar, and vanilla extract until smooth and creamy. This step is all about achieving that luscious texture. Make sure there are no lumps; a smooth mixture is key to a silky cheesecake!
Step 5: Whip the Cream
In another bowl, whip the heavy cream until stiff peaks form. This means when you lift the whisk, the cream holds its shape. Achieving stiff peaks is crucial because it adds lightness to your cheesecake, making it airy and delightful.
Step 6: Combine Mixtures
Gently fold the whipped cream into the cream cheese mixture. Use a spatula and a gentle hand to maintain that airy texture. Folding is an art; you want to combine them without deflating the whipped cream. This step is where the magic happens!
Step 7: Prepare the Banana Pudding
In a separate bowl, whisk together the instant banana pudding mix and milk until thickened, about 2 minutes. This mixture will bring that classic banana flavor to your cheesecake. Make sure it’s thick enough to hold its shape when layered.
Step 8: Layer the Cheesecake
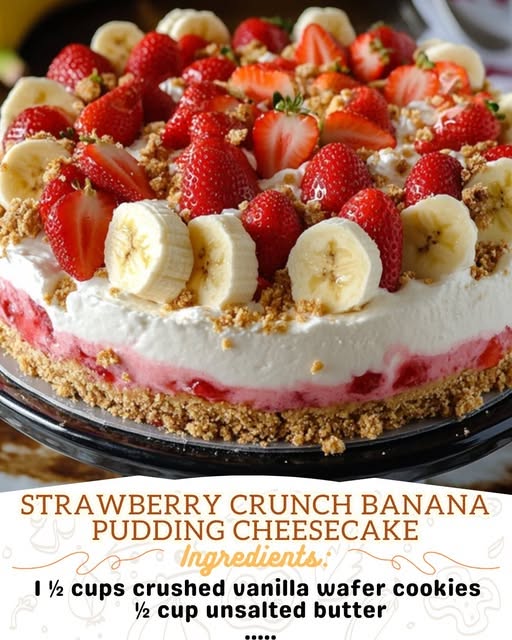
Now it’s time to layer! Start by spreading half of the banana pudding cheesecake mixture over the cooled crust. Then, add a layer of sliced fresh strawberries. Top it off with the remaining cheesecake mixture, smoothing the top with a spatula. This layering creates a beautiful presentation!
Step 9: Add the Topping
Sprinkle the crushed strawberry cereal evenly over the top of the cheesecake. This crunchy topping not only adds texture but also a burst of strawberry flavor. It’s the finishing touch that makes your cheesecake visually appealing and delicious!
Step 10: Refrigerate
Finally, refrigerate your cheesecake for at least 4 hours, or until set. Chilling is essential for the flavors to meld and the cheesecake to firm up. Patience is key here; the wait will be worth it when you slice into that creamy goodness!
Tips for Success
Use room temperature cream cheese for a smoother mixture.
Don’t skip the chilling time; it’s crucial for the cheesecake to set properly.
For a cleaner slice, use a hot knife to cut through the cheesecake.
Feel free to customize with your favorite fruits or toppings.
Make it a day ahead for the best flavor and texture!
Equipment Needed
9-inch springform pan: Essential for easy removal of the cheesecake. A regular pie dish works too, but slicing will be trickier.
Mixing bowls: Use a variety of sizes for mixing ingredients. Glass or stainless steel are great options.
Electric mixer: A hand mixer or stand mixer makes beating the cream cheese a breeze.
Spatula: Perfect for folding and smoothing the cheesecake layers.
Whisk: Handy for mixing the pudding and milk until thickened.
Variations
Chocolate Lovers: Swap out the vanilla wafer cookies for crushed chocolate cookies and use chocolate pudding mix for a rich twist.
Nutty Delight: Add chopped nuts like pecans or walnuts between the layers for an extra crunch and flavor.
Fruit Medley: Mix in other fruits like blueberries or raspberries along with the strawberries for a colorful and fruity explosion.
Gluten-Free Option: Use gluten-free cookies for the crust to make this dessert suitable for gluten-sensitive friends.
Vegan Version: Substitute cream cheese with a vegan alternative and use coconut cream instead of heavy whipping cream for a plant-based delight.
Serving Suggestions
Pair with a dollop of whipped cream for an extra touch of indulgence.
Serve alongside fresh fruit salad for a refreshing contrast.
Complement with a scoop of vanilla ice cream for a classic combo.
Drizzle with chocolate or caramel sauce for added sweetness.
Garnish with mint leaves for a pop of color and freshness.
FAQs about Strawberry Crunch Banana Pudding Cheesecake
Curious about the Strawberry Crunch Banana Pudding Cheesecake? Here are some common questions that might pop into your mind:
Can I make this cheesecake ahead of time?
Absolutely! In fact, making it a day ahead enhances the flavors. Just be sure to keep it refrigerated until you’re ready to serve.
What can I substitute for the cream cheese?
If you’re looking for a lighter option, consider using Greek yogurt or a vegan cream cheese alternative. Both will give you a creamy texture without sacrificing flavor.
How do I store leftovers?
Store any leftovers in an airtight container in the refrigerator. It should stay fresh for up to 3 days, but trust me, it won’t last that long!
Can I use frozen strawberries instead of fresh?
Yes, you can! Just make sure to thaw and drain them well to avoid excess moisture in your cheesecake.
Is this cheesecake suitable for a gluten-free diet?
Yes! Simply swap the vanilla wafer cookies for gluten-free cookies, and you’re good to go. Everyone can enjoy this delicious dessert!
Final Thoughts
Creating the Strawberry Crunch Banana Pudding Cheesecake is more than just baking; it’s about crafting memories. Each layer tells a story, from the crunchy crust to the creamy filling, and the vibrant strawberries that dance on top. This dessert brings joy not only to your taste buds but also to the hearts of those you share it with. Whether it’s a family gathering or a casual weeknight treat, this cheesecake is sure to impress. So, roll up your sleeves, gather your ingredients, and let the magic unfold in your kitchen. You won’t regret it!
ADVERTISEMENT

