
Engaging Introduction
Let me tell you about the dessert that made me forget I was eating “healthy.”
I’ve tried a lot of low-carb, plant-based desserts over the years. Most were disappointing. Dry. Grainy. Oddly sweet in a chemical way. They reminded me that I was eating a compromise—a substitute for the real thing.
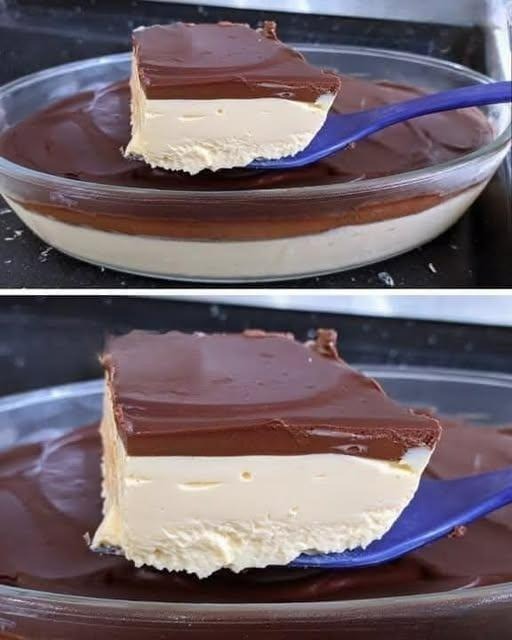
Then I made these No-Bake Chocolate Silk Bars.
The first bite was a revelation. The texture was silky, smooth, and melt-in-your-mouth rich. The chocolate flavor was deep and satisfying. The crust was buttery and crisp. And the best part? I made them in 15 minutes with seven simple ingredients. No oven. No weird sugar alcohols. No compromises.
These bars are vegan, gluten-free, keto-friendly, and refined sugar-free. But more importantly, they’re just really, really good chocolate dessert.
My non-vegan, non-keto, sugar-loving husband ate three in one sitting. He didn’t ask about the ingredients. He just asked for more.
Let me show you how to make them.
Why You’ll Love These Chocolate Silk Bars
No baking required – Just a food processor and a refrigerator.
7 simple ingredients – All found at any grocery store.
Low-carb & keto-friendly – Naturally sweetened with monk fruit or allulose.
Vegan & plant-based – No dairy, no eggs.
No weird sugar alcohols – No maltitol, no erythritol aftertaste (if you use allulose).
Silky smooth texture – Like a cross between chocolate mousse and fudge.
For the Crust:
1 cup almond flour (finely ground)
¼ cup unsweetened cocoa powder
¼ cup melted coconut oil (or vegan butter)
2 tablespoons powdered sweetener (allulose, monk fruit, or erythritol)
Pinch of salt
For the Chocolate Silk Filling:
1 cup raw cashews, soaked (see instructions below)
½ cup full-fat coconut milk (canned, not carton)
½ cup melted coconut oil
½ cup unsweetened cocoa powder
½ cup powdered sweetener (allulose is best for silky texture)
1 teaspoon vanilla extract
Pinch of salt
Optional Toppings:
Flaky sea salt (highly recommended)
Sugar-free chocolate shavings
Toasted coconut flakes
Substitutions & Swaps:
No cashews? Use macadamia nuts or blanched almonds (soaked). Texture may be slightly different.
No coconut oil? Use vegan butter or cacao butter (flavor will be richer).
No coconut milk? Use full-fat oat milk or unsweetened almond milk (texture will be slightly less creamy).
No almond flour? Use finely ground pecans or walnuts, or use a combination of almond flour and coconut flour (reduce liquid slightly).
Step-by-Step – No Oven, No Fuss
Step 1: Soak the Cashews
Place the cashews in a bowl. Cover with boiling water. Let soak for 30-60 minutes (or overnight in the refrigerator). Drain and rinse.
Pro tip: Softer cashews = silkier filling. Don’t skip this step.
Step 2: Line Your Pan
Line an 8×8-inch baking dish with parchment paper, leaving an overhang on two sides (for easy removal).
Step 3: Make the Crust
In a medium bowl, combine the almond flour, cocoa powder, melted coconut oil, powdered sweetener, and salt. Stir until well combined. The mixture should resemble wet sand.
Press the crust firmly into the bottom of the prepared pan. Use the bottom of a measuring cup to pack it down evenly.
Step 4: Make the Chocolate Silk Filling
In a high-speed blender or food processor, combine the soaked and drained cashews, coconut milk, melted coconut oil, cocoa powder, powdered sweetener, vanilla extract, and salt.
Blend on high for 2-3 minutes, until completely smooth and silky. Scrape down the sides as needed.
Pro tip: If the mixture is too thick, add 1-2 tablespoons of water or coconut milk. If it’s too thin, add 1-2 tablespoons of cocoa powder or almond flour.
Step 5: Assemble
Pour the chocolate filling over the crust. Spread evenly with a spatula.
Step 6: Chill
Refrigerate for at least 2-3 hours, until completely firm. Overnight is better.
Step 7: Slice and Serve
Lift the bars out of the pan using the parchment overhang. Place on a cutting board. Use a sharp knife to cut into 16 bars (or 9 for larger portions).
Pro tip: Wipe the knife clean between cuts for neat edges.
Sprinkle with flaky sea salt before serving. (Trust me on this.)
My Best Tips for Chocolate Silk Success
Soak the cashews thoroughly. Soft cashews = silky filling. Hard cashews = grainy filling. Don’t rush this step.
Use a high-speed blender. A regular blender may struggle with the cashew mixture. A food processor works, but a high-speed blender (Vitamix, Blendtec) is best.
Taste and adjust sweetness. Different sweeteners have different sweetness levels. Start with ⅓ cup and add more to taste.
Don’t skip the salt. Flaky sea salt on top isn’t just garnish. It balances the sweetness and enhances the chocolate flavor.
Chill thoroughly. If you cut the bars too soon, they’ll be soft and messy. Patience is rewarded with clean slices.
Store in the refrigerator. These bars soften at room temperature. Keep them chilled.
Fun Variations (Once You’ve Mastered the Original)
Peanut Butter Chocolate Silk Bars – Add ¼ cup peanut butter to the filling. Swirl an additional 2 tablespoons on top before chilling.
Mint Chocolate Silk Bars – Add ½ teaspoon peppermint extract to the filling. Garnish with crushed sugar-free peppermint candies.
Orange Chocolate Silk Bars – Add 1 tablespoon orange zest and ½ teaspoon orange extract to the filling.
Espresso Chocolate Silk Bars – Add 1 tablespoon instant espresso powder to the filling (dissolve in 1 tablespoon hot water first).
Raspberry Swirl Chocolate Silk Bars – Warm ¼ cup sugar-free raspberry jam. Swirl into the filling before chilling.
Coconut Chocolate Silk Bars – Add ½ cup unsweetened shredded coconut to the crust. Top with toasted coconut flakes.
What to Serve with Chocolate Silk Bars
These bars are rich and satisfying on their own. But here are a few pairing ideas:
Cold almond milk or oat milk – The creaminess complements the chocolate
Espresso or strong coffee – Classic chocolate pairing
Fresh berries – The tartness balances the richness
Coconut whipped cream – For an extra-decadent treat
Sugar-free hot chocolate – Because you can never have too much chocolate
How to Store, Freeze, and Make Ahead
Refrigerator: Store in an airtight container for up to 2 weeks. Keep chilled.
Freezer: Wrap individual bars in plastic wrap, then place in a freezer bag. Freeze for up to 3 months. Thaw in the refrigerator before serving (or eat frozen for a fudge-like texture).
Make ahead for parties: Make the bars up to 1 week in advance. Store in the refrigerator. Slice just before serving.
Transporting: Keep chilled. Use a cooler bag if traveling more than 30 minutes.
For Complete Cooking STEPS Please Head On Over To Next Page Or Open button (>) and don’t forget to SHARE with your Facebook friends
ADVERTISEMENT

